Would you rather watch a video?
Table of Contents
- Introduction
- Finding Someone to Install for You
- Elevator Preparation
- Serial Number Activation
- Site Preparation
- Basic Elevator Installation
- Advanced Elevator Options and Guidelines
- Dialog Menu Explanations
- Configuration Notecards
- Frequently Asked Questions
INTRODUCTION
Firstly, I would like to thank you for purchasing one of our elevator packages! Rest assured that this is a wise investment, as you are entitled to free elevator updates through to version 3! Please join our subscription group to remain informed about elevator updates, as well as checking out UnionMicro.net from time to time.
If you are currently a version 1 Union Micro elevator user, you will find a lot of these instructions to be repetitive. We’ve tried our best to make the installation procedure as similar to v1 elevators as possible, and even managed to make it better in some areas.
FINDING SOMEONE TO INSTALL FOR YOU
Are you not very handy at building or assembling things in Second Life, or just don’t have the time? Stop by Union Micro and take a peek at the Installation Services kiosk to find someone willing to install your elevator for you for a small fee. These installation services are NOT directly affiliated with Union Micro – think of them as contractors. Each installer offers something a little different and they all have different pricing schemes so be sure to read them all and plan according to what you need done and what your budget is.
If you’d like to be listed in the installer kiosk, send me a notecard with the services you offer, your availability, and your pricing. You must currently own a Union Micro elevator system and be a resident of Second Life for at least 6 months. All applications are subject to approval.
ELEVATOR PREPARATION
All v2 elevator parts come as non-functional shells. In order to get your elevator working, you must first install the scripts from a script package sold separately from the shells. If you’ve purchased your shells directly from Union Micro, your shells will be configured to listen on channel 7777 by default, which is also the default for the install disk. You may want to check the __config notecards in all of your shells as well as the disk to make sure the channels match.
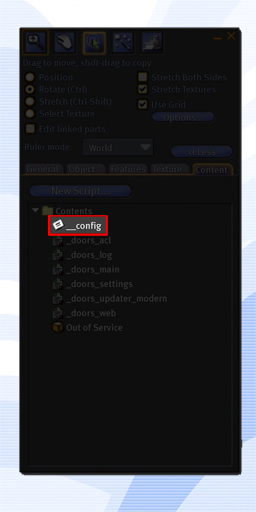
- Start by rezzing one of each product type (one car, one set of doors, and one controller). As you rez them you will see a progress bar as they load their settings from their notecards. As a shell, they only need to know their channel so the progress bar will stop long before it reaches 100%.
- Once the objects are done loading, rez your install disk (not to be confused with proxy disk). It will also load its configuration notecard. Ensure that its channel matches that of all shells that are rezzed.
- Touch the install disk and it will install the elevator scripts into all of your shells.
- Now you may take your working elevator parts back into your inventory as fully working elevator parts for later use.
You can tell the difference between shells and working parts simply by looking for the red hover text. Shells always have red hover text saying that they are, in fact, shells. You can also look at the object description – shells will say “[NOT INSTALLED]†beside the script version text because the scripts are not installed.
SERIAL NUMBER ACTIVATION
If you’ve purchased the complete Script Package from Union Micro, you will have received an object called “Elevator Unlocker” inside of the Script Package box. If you received your elevator system pre-installed as part of a building, you will have to purchase the Elevator Unlocker at Union Micro in order to activate your elevator.
To generate your serial number, simply rez the Elevator Unlocker object onto the ground and touch it. It will generate your serial number and tell it to you in private owner-only chat. Copy your serial number and paste it into the car’s “__config” notecard beside the “SerialNumber=” line.
Your serial number is tied to your avatar and will not work on another avatar’s elevator. You may use the same serial number in any generation two elevator that you own.
SITE PREPARATION
Since Union Micro elevators use real physics for movement, you will have to create a hole in each floor for your car to travel through. You can create a hole in your floor either by building your floor around the hole or by hollowing a large prim in your floor. Keep in mind that the car REQUIRES AT LEAST 0.1 meters of clearance on ALL SIDES (top AND bottom as well) to operate or it will get stuck. If your car moves towards a floor but never actually arrives and opens its doors, it is stuck and you need to make more room for it. If the car gets stuck far enough away from the destination floor it will tell you that it is stuck by whispering, so stay close to it.
BASIC ELEVATOR INSTALLATION
The next few sections will go over the basics of installing your elevator parts. Following these few sections will be a section that goes into more detail about the various options and buttons available on each elevator part as well as some general guidelines and limitations.
CONTROLLER INSTALLATION
Rez the controller somewhere in the same region that you intend to install the elevator. It will automatically load its settings when you rez it. Optionally, you can touch the controller and choose ‘Read Config’ from the menu that appears. You will need to do a ‘Read Config’ whenever you change settings in the notecard.
- Rez one set of doors on each floor. You do not need to worry about the alignment of your doors as later we will align all doors to the bottom floor with one command. If you intend on using a dual entry car, you will have to edit the configuration notecard in each set of rear doors and change the DoorSide setting from ‘Front’ to ‘Rear’.
- Position your bottom floor doors so they are on the edge of and centered on the hole for your car. Each door will automatically load its default settings when you rez it. After rezzing all doors, touch the controller and choose ‘Hard Reset’ to force all doors on the same channel to reload their settings.
- Touch the controller and choose ‘Test Comms’ from the menu to make sure that all of your doors are in communication with the controller. If any fail the test, check the channel in their notecard and do a ‘Read Config’ on the door in question (or a hard reset).
- Touch the controller again and choose ‘Set Floors’ to make the doors automatically learn which floor they are located on. Ensure that your bottom-most door object is named “1†– if it is another number, check to make sure that you don’t have any doors rezzed below that door and then run the ‘Set Floors’ command again.
- Touch the controller one last time and choose ‘Align Doors’ from the menu. This will cause all doors to align to the bottom floor door. If you have rear doors as well, all rear doors will align to the bottom-most rear door.
- Rez your car and center it on the hole you created for it. Again, make sure that it has enough clearance on all sides (including top and bottom) to travel (at least 0.1m).
- Touch the panel behind the call buttons inside of the car (or the no smoking sign) and choose ‘Install’ from the menu that appears.
ADVANCED ELEVATOR OPTIONS AND GUIDELINES
General Guidelines
This section is a bit of an information dump with tips about installing your elevator. I highly suggest looking over this section as it could likely save you some headaches down the road.
- All single rear elevator doors (a rear door on a floor by itself) must be placed more than 2.7 meters higher or lower than an existing front door or the rear door will snap to the height of the closest front door.
- All doors align with the lowest door on their respective side when the align doors command is used. All rear doors will align to the bottom rear door and all front doors will align to the bottom front door.
- Whenever you add or remove a door from an elevator system, you must issue a set floors command before installing your car again.
- In order to ensure that you have a properly configured elevator system, you should remember the basic order of menu commands to get you up and running: Hard Reset > Set Floors > Align Doors > Install
- The Align Doors command is optional and does not have to be executed for your elevator to work properly. However, if you have stray doors colliding with your car, this will obviously have a negative affect on your elevator’s performance.
- Always give components time to communicate after issuing commands — not all commands will let you know when they have finished. There are tell-tale signs that you can watch for to know if a command has finished being issued:
- Set Floors: You will hear one or more doors whisper that they have set their floor number.
- Align Doors: You will hear one or more doors above the first floor whisper that they have been aligned.
- Install: Elevator whispers that it has finished downloading floor coordinates and starts to move. If it tells you that it’s downloading the coordinates but never finishes, you will have to check your door configuration.
- You should generally use more than 0.1m of clearance around your elevator car as 0.1m is the minimum. If you only leave 0.1m clearance your car will likely get stuck unexpectedly as it collides with avatars and other things.
- You may fill the gap between your elevator doors and your car with phantom prims to prevent avatars from seeing into the elevator shaft.
- All elevator parts have two version numbers associated with them.
- Script version: This is the version number of the scripts inside the elevator. The scripts are what make the elevator function and can be updated by rezzing your script package box.
- Object version: This is the version number of the shell that you are using. Don’t expect this version to change unless entirely new scripts are added to the shell or the visual appearance of the shell is modified. Shells can be updated by rezzing the box they came in.
- All version numbers are represented as X.Y.Z numbers.
- X is only incremented for a major release, such as a new product line or entirely new product model.
- Y is incremented when a feature is added to the existing product.
- Z is incremented when no features are added but bugs have been fixed.
Controller
You can bring up the controller dialog menu by touching anywhere on the main body of the controller.
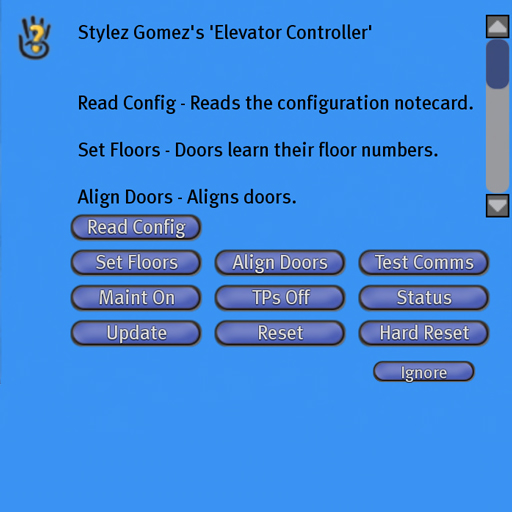
- Read Config: Loads all settings from the configuration notecard.
- Set Floors: Assigns floor numbers to all rezzed doors.
- Align Doors: Aligns doors to the bottom-most door on each side (front/rear).
- Test Comms: Tells you which parts of your elevator are communicating with the controller.
- Maint On/Off: Toggles maintenance mode on and off.
- TPs On/Off: Toggles teleporters on and off.
- Status: Displays information about the controller.
- Reset: Resets the scripts in the controller and reloads the configuration notecard.
- Hard Reset: Resets all communicating objects and causes them to reload their configuration notecards. It is recommended to do a hard reset after using an install disk to either install scripts or upgrade scripts in your parts.
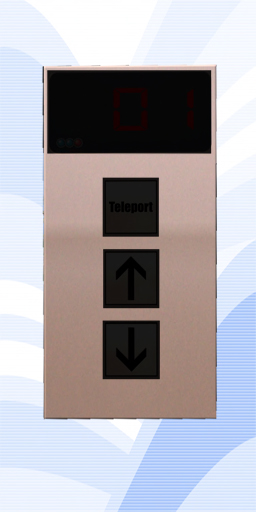
Doors
You can bring up the door’s dialog menu by touching on the panel behind the buttons. The places where you shouldn’t touch to get the menu are shaded black in the image below.
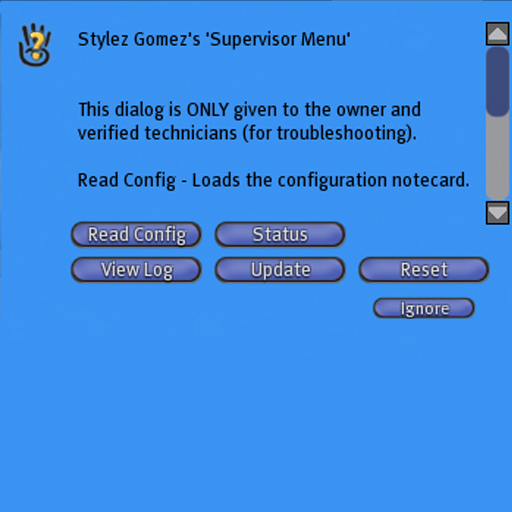
- Read Config: Loads all settings from the configuration notecard.
- Status: Displays information about the doors.
- View Log: Displays the last 25 events that were logged by the door.
- Reset: Resets the scripts in the doors and reloads the configuration notecard. You will have to do a Set Floors from the controller after resetting the doors.
Car
You can bring up the car’s dialog menu by touching on the panel behind the buttons. The places where you shouldn’t touch to get the menu are shaded black in the image below.


- Install: Loads the settings from the configuration notecard, loads access control lists from the floor buttons, downloads floor coordinates from the doors, and puts the elevator into a working state. The car will go to the bottom floor or the idle floor after this is finished.
- Read Config: Loads all settings from the configuration notecard and loads access control lists from the floor buttons. The car does not move after a read config.
- Status: Displays information about the car.
- View Log: Displays the last 25 events that were logged by the car.
- Reset: Resets the scripts in the car and reloads the configuration notecard. You will have to do an Install after resetting the car.
CONFIGURATION NOTECARDS
All elevator shells come with configuration notecards inside of them. You can find these by looking for a notecard named __config in each object. I won’t go into details as the configuration notecards are self explanatory if you read the comments inside of them. The most important setting for the configuration notecards is the channel setting. Each of your separate elevator systems in the same region must be on a different channel or all kinds of weird things will happen. Also, each car configuration notecard is tailored to a specific car shell and the settings at the bottom of the notecard must be maintained for each shell.
ACCESS CONTROL LISTS
Each button inside of the car has a notecard named __floorsettings. You can set the access control (who is and is not allowed) for each floor inside of the button for the floor in question. Unlike v1 elevators, in v2 you only have to specify the ACL inside of the car as it is sent to all doors when the notecards are finished loading.
FLOOR ARRIVAL MESSAGES
Each button inside of the car has a notecard named __floorsettings. You may edit the “ArrivalMessage=” to anything you want the button to say when it arrives at its respective floor.
FREQUENTLY ASKED QUESTIONS
Q: My elevator doors are not opening when the car arrives at that floor, what’s wrong?
A: This is usually caused by different channels set inside the configuration notecards (they have to be the same). Also make sure to touch your controller and choose “Read Config” so that it reads its configuration. This may also be caused by the car not actually reaching the floor coordinates due to collisions. This is common with the bottom floor when you haven’t cleared room below the elevator car. It’s not uncommon for me to see an elevator car that is colliding with the floor or is too close to the exterior doors.
Q: What is the maximum height that the elevator can go?
A: The car itself has been tested up to 500 meters with no problems at all, your mileage may vary. As of Havok 4 the elevator should theoretically work up to about 4096 meters but that is yet to be verified.
Q: How many floors can I have in my building?
A: There are enough buttons in most elevator cars for 16 floors. The scripts themselves will support many more, and the textures have buttons for a floor number of up to 31. Please refer to the Shell Creation SDK for more information about modifying your elevator parts. Check out Union Micro in-world or unionmicro.net to inquire about SDK availability.
Q: I have 2 elevators in the same region and the channels are different, but they’re behaving erratically. How do I fix it?
A: Channels have to have a difference greater than 3 between them (5 to be safe). If one elevator’s channel is 1000, the other should be 1004 (or higher) or 996 (or lower). This is due to the fact that the elevators actually communicate on 3 different channels based on the channel you select. This improves script efficiency and reduces the impact on simulator performance.
Q: My elevator car isn’t moving at all, what’s wrong?
A: Make sure there are floor buttons inside of it. If they’re all invisible, this means that it didn’t download any floor coordinates from the doors – make sure your doors are working properly by using the “Test Comms” button on the controller. If they’re all visible and you have less than 16 floors, you’ve likely not even told it to load the settings by clicking the “Install” button from the supervisor menu. It’s VERY common that the elevator car is obstructed by other prims. Look for invisible prims, or prims that come very close to the elevator car’s path of travel. Check to make sure that your car isn’t traveling too close to the exterior doors (the ones that you put on each floor) – create a prim that is 0.1m wide in all directions and use this as a guide to the spacing required by your elevator car. You may also need to cut a hole in the floor below where the elevator car stops on the bottom floor or raise the door on the bottom floor.
Q: The movement is too jerky for my taste, can you fix it?
A: This can be compensated for by lowering the speed setting in the “__config” notecard. I’ve found 0.05 to work very nicely. The elevator jerks because it is colliding with your avatar. You could try linking a poseball to the elevator car and sitting on that – that will eliminate the jerking. If you do link poseballs to your car, make sure the car is not more than 31 prims or it won’t work anymore. Also keep in mind that an avatar sitting on the poseball will also add one more to the prim count of your elevator car – so a 31 prim car with a poseball will become a non-functional 32 prim car when someone sits on the poseball.
Q: How do I get rid of the big gap between my elevator car and the exterior doors on each floor?
A: You can get rid of this gap by filling it in with phantom prims. Phantom prims don’t interfere with the movement of the elevator car.
Q: I’ve tried everything and I’m about to give up. What should I do now?
A: Reset the elevator and read the instructions AGAIN paying very close attention. I know what it’s like to want to set something up really badly and just skim the instructions. It’s not fair to me to get IM’s from people who refuse to RTFM. 🙂 If all else fails and you’ve HONESTLY tried, then you can IM me and I’ll offer assistance.
You can also ask in the Union Micro Support group or drop by the main Union Micro store and take a look at the online indicators and see if there is any staff available to assist you.