VIDEO INSTALLATION GUIDE NOW AVAILABLE!
Table of Contents
- Before You Begin
- Getting Started
- Access Control Lists
- Modification
- Notes
- Frequently Asked Questions
- Example Elevator Car Configuration Notecard
- Final Thoughts
These instructions were last updated September 18th, 2007.
These instructions were created for the Interior Elevator Kit. So, for instance, if you bought all pieces individually, you may or may not have purchased a shaft.
The most common problem I come across is a stuck elevator car. Make sure it isn’t colliding with anything – you can sometimes identify this by sparks shooting from the car. It doesn’t necessarily have to be hitting something to be stuck – things that are within 0.1m of it can prevent it from moving.
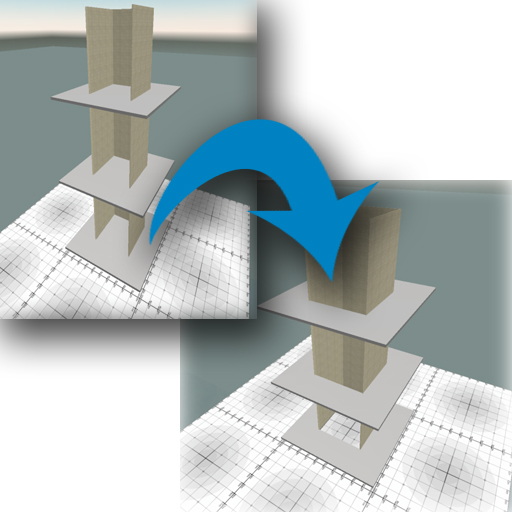
- OPTIONAL: Place the elevator shaft on the bottom floor where you want your elevator to start and stretch and copy it until you reach your top floor. This is optional but it makes placing the elevator car easier. The elevator shaft is NOT required for normal elevator operation.
- NOTE: It’s a good idea to place your shaft below the center of the ceiling above it, this way you can hollow the ceiling to make a hole for the elevator car to pass through. Also, try to center it on the floor beneath it as the elevator may need to go into the floor to get to the height of the first floor doors.

- Place an elevator station for each floor. Use the “bottom floor” one for the bottom floor, the “top floor” one for the top floor, and the “middle floor” one for all floors in between. Don’t worry about the X and Y coordinates as there is a command the will center all doors directly above your bottom floor door. You can rez the doors right on the floor, or move them down into the floor until the bottom of the door frame disappears. This will allow a flat entrance into the elevator car instead of having to step over the door frame.
- Config:
- After placing each elevator station, you can edit the “_config” notecard in each station. It’s suggested that you change the “Channel=” entry to a random number unique to your elevator installation, and use this channel in ALL other “_config” notecards (other elevator stations, elevator car, controller) in this installation. Other installations nearby should have their own unique channel with a number at least 5 higher to prevent interference (the system uses a range of 3 channels based on the channel you specify).
- Example: Channel=87325
- Edit the rest of the “_config†notecard to suit your personal preference. Refer to the comments above each setting for information on what it does. When finished, save and close the notecard.
- After placing each elevator station, you can edit the “_config” notecard in each station. It’s suggested that you change the “Channel=” entry to a random number unique to your elevator installation, and use this channel in ALL other “_config” notecards (other elevator stations, elevator car, controller) in this installation. Other installations nearby should have their own unique channel with a number at least 5 higher to prevent interference (the system uses a range of 3 channels based on the channel you specify).
- Touch the panel behind the call buttons (the arrows you touch to call the elevator car). From the dialog menu that appears choose “Read Config.†This will load all settings from your “_config†notecard. Repeat for each elevator station.
- Place the elevator controller somewhere within the same region as the doors. Avoid placing the controller inside the elevator shaft, as it may interfere with elevator car movement.
- Edit the “_config” notecard inside of the elevator controller. Set its channel to the same channel used in the elevator stations. When finished, save and close the notecard.
- Touch the elevator controller.
- Touch the elevator controller and choose “Read Config†from the menu that appears. This will load the settings contained in its “_config†notecard.
- Touch the elevator controller again and choose “Test Comms” to verify that all of your doors are in communication with your controller. If any doors fail to appear on the list, check the “_config” notecard for the door in question and verify that it has the same channel as all other pieces. Then, do a “Read Config” on the door.
- Touch the controller again and choose ‘Set Floors’ to make the doors automatically learn which floor they are located on.
- Touch the controller one last time and choose ‘Align’ from the menu. This will cause all doors to align to the bottom floor door.
- OPTIONAL: Touch the elevator controller and choose “Set TPS†to have all of the elevator stations report their locations to each other for use with teleportation. Afterwards, you may right-click the up and down call buttons and choose “Teleport†to teleport one floor up or one floor down. You may disable the Teleport feature by choosing “Clear TPs” afterwards.
- NOTE: This bypasses any security measures that you employ in your elevator car and will not work correctly for elevator doors that are more than 300m apart.
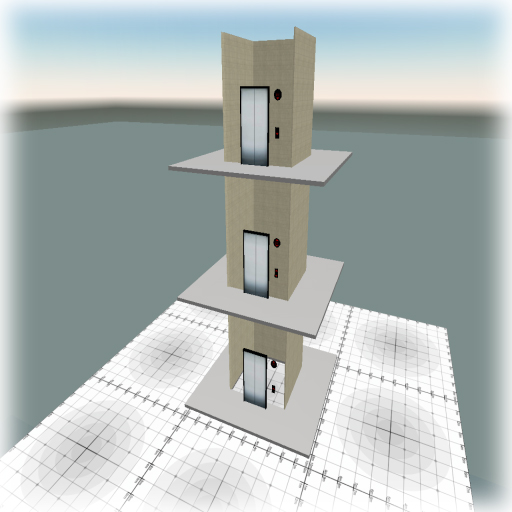
- Place your elevator car.
- NOTE: It’s always good practice to reset the car from the Owner’s Menu when you rez it (see step 11). The scripts reset themselves when you rez the car but it’s a good idea to reset them anyway.
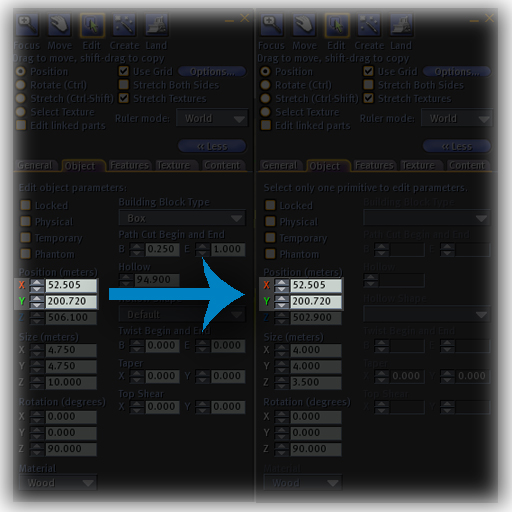
- If you’re using the elevator shaft, you should copy its X- and Y-coordinates and paste those into your elevator car’s location. Otherwise, you’ll have to eyeball things and try to line your car up to the doors on the first floor. Before you go any further you should bring up the Owner’s Menu (see step 10) and choose “Update†to check for a newer version.
- Config Notecard
- Open the “_config†notecard in your elevator car.
- Set the channel to the same channel as used before (see FAQ below for more information pertaining to the channel).
- Edit the rest of the “_config†notecard to suit your tastes.
- After saving the notecard, the elevator car should inform you that it detected a change in its configuration notecard.
- Touch the silver panel BEHIND the floor buttons inside of the elevator car to get the Owner’s Menu. Select “Install” from the blue dialog box to load ALL configuration options.
You only need to use the “Install” button once – after that it’s suggested that you use the “Read Config” option to read all options except floor locations.- NOTE: Unneeded buttons in the car will hide themselves to avoid passenger confusion. You may also unlink them from the elevator car to save on prims.
- The rest is up to you. Finish aligning your elevator stations and fill in the gaps around them, replace the elevator shaft with one of your own or remove it completely, etc. There should be no objects inside the elevator shaft as these may impede elevator movement. You may place phantom prims inside of the elevator shaft such as thicker door frames to eliminate the gap between the elevator car and elevator stations.


ACCESS CONTROL LISTS
You can find the access control lists, “_accesslist,” inside each of the floor buttons inside of the elevator car. Simply edit the notecards according to the instructions within them, save, then choose “Read Config” from the Owner’s Menu. That’s all there is to it!
There are also access control lists in each call button of the elevator doors. Configure these the same as the ones in the car.
NOTE: All objects have the modify permission.
Elevator Car:
You may link and unlink parts of the elevator car. Link order does not matter EXCEPT:
- The root prim (last prim linked) MUST be the hollow cube that makes the side and back walls of the elevator car (applies to Pacifica – other cars will vary – the prim with the yellow highlight is the root prim).
- You may unlink unused floor buttons from the elevator car to save on prims.
Elevator Stations:
You may link and unlink parts of the elevator stations. Link order does not matter EXCEPT:
- The root prim (last prim linked) should be the black door frame. For round doors there is an invisible door frame that needs to be the root.
- As of version 1.3.0 of elevator stations, the link numbers of the LED numbers do not matter.
See the modification video at Blip.tv or the Modifications Page for more information.
- DON’T FORGET – the reset command in the Owner’s Menu is your friend. Resetting your elevator and choosing the “Install†option again works wonders sometimes.
- The elevator car requires 0.1m clearance on all sides (possibly more above and below) from other objects or else it may get stuck.
- Just because the elevator car isn’t physically touching an object doesn’t mean it isn’t colliding with it.
- When the elevator resets, the boarding station’s LED displays may not update. They will update when the elevator resumes normal operation.
Q: My elevator doors are not opening when the car arrives at that floor, what’s wrong?
A: This is usually caused by different channels set inside the notecards (they have to be the same), and/or a controller that is out of range. Also make sure to touch your controller and choose “Read Config†so that it reads its configuration. This may also be caused by the car not actually reaching the floor coordinates due to collisions. This is common with the bottom floor when you haven’t cleared room below the elevator car. It’s not uncommon for me to see an elevator car that is colliding with the floor or is too close to the exterior doors.
Q: What is the maximum height that the elevator can go?
A: The car itself has been tested up to 500 meters with no problems at all, your mileage may vary. As of July 10th, 2007, the elevator system will work at any height within the same region due to the new llRegionSay LSL function, HOWEVER, I believe physical object may be limited to 768m.
Q: How many floors can I have in my building?
A1: There are enough buttons in the elevator car for 10 floors. The scripts themselves will support many more, but I figured 10 floors is about average and I don’t want it to be too prim-heavy.
A2: There is also a 16 floor elevator car included with all elevator car packages.
A3: The mule elevator car has a 20 floor version instead of 16.
Q: I have 2 elevators near each other and the channels are different, but they’re behaving erratically. How do I fix it?
A: Channels have to have a difference greater than 3 between them (5 to be safe). If one elevator’s channel is 1000, the other should be 1004 (or higher) or 996 (or lower).
Q: My elevator car isn’t moving at all, what’s wrong?
A: Make sure there are floor buttons inside of it. If they’re all invisible, this means that it didn’t download any floor coordinates from the doors – make sure your doors are working properly by using the “Test Comms” button on the controller. If they’re all visible and you have less than 10 floors, you’ve likely not even told it to load the settings by clicking the “Install” button from the owner’s menu. It’s VERY common that the elevator car is obstructed by other prims. Look for invisible prims, or prims that come very close to the elevator car’s path of travel. Check to make sure that your car isn’t traveling too close to the exterior doors (the ones that you put on each floor) – create a prim that is 0.1m wide in all directions and use this as a guide to the spacing required by your elevator car. You may also need to cut a hole in the floor below where the elevator car stops on the bottom floor or raise the door on the bottom floor.
Q: When I press a button to go up or down on the elevator stations they shout “#d” or “#u” and nothing happens. What’s the deal?
A: They have not loaded their settings properly. Make sure you edit their “_config” notecard and set all the fields to the required values. The name of the door object should be a number and not the default “Elevator Station – Bottom/Middle/Top Floor.” Make sure the Channel and Floor fields are integers between 1 and something like 2,000,000,000 (yes it’s a big number).
Q: The movement is too jerky for my taste, can you fix it?
A: This can be compensated for by lowering the speed setting in the “_config” notecard. I’ve found 0.05 to work very nicely. The elevator jerks because it is colliding with your avatar. You could try linking a poseball to the elevator car and sitting on that – that will eliminate the jerking. If you do link poseballs to your car, make sure the car is not more than 31 prims or it won’t work anymore.
Q: How do I get rid of the big gap between my elevator car and the exterior doors on each floor?
A: You can get rid of this gap by filling it in with phantom prims. Phantom prims don’t interfere with the movement of the elevator car.
Q: I’ve tried everything and I’m about to give up. What should I do now?
A: Reset the elevator and read the instructions AGAIN paying very close attention. I know what it’s like to want to set something up really badly and just skim the instructions. It’s not fair to me to get IM’s from people who refuse to RTFM. 🙂 If all else fails and you’ve HONESTLY tried, then you can IM me and I’ll offer assistance.
EXAMPLE ELEVATOR CAR CONFIGURATION NOTECARD
# Union Micro Elevator Configuration Notecard
### COMMUNICATION ###
# Unique chat channel for your elevator system to communicate on.
# Other nearby objects, including other Union Micro elevators may interfere with it if they are also on the same channel.
# If you are unsure of what to do here, you may leave this the way it is.
Channel=12345
######
### GENERAL SETTINGS ###
# Enter the time in seconds that you wish the doors to stay open for – don’t forget to set your doors to the same time!
DoorTime=7
# Enter the mode corresponding to the way you want your doors to open – don’t forget to set your doors to the same mode!
# Mode 1 – Doors slide in the same direction off to one side of the car.
# Mode 2 – Doors slide in different directions (part in the middle) and go to separate sides.
DoorMode=2
# Specify whether you want your elevator to play music or not. Music=1 for On, Music=0 for Off
Music=1
# Enter the speed you wish the elevator to travel. Valid numbers are from 0.01 to 1.0. Default is 0.1.
# DUE TO THE LIMITATIONS OF SECOND LIFE, THE ELEVATOR WILL RUN SMOOTHER AT SLOWER SPEEDS.
Speed=0.05
# Choose the Red/Green/Blue values for the illumination of the floor buttons inside the elevator when they’re clicked.
# Valid numbers range from 0 to 255.
Red=255
Green=255
Blue=0
Your elevator system should be functioning well now.
Don’t be afraid to offer feature suggestions to me. Lots of the updates I do contain feature requests from users. Stay up to date on things by checking out the Union Micro website from time to time, I often post updates on things I’m working on there. If you send me an instant message and it goes un-answered, it’s possible that I’ve reached my message cap. Your best option is to contact support, post in the Union Micro forum or ask in the Union Micro Support group.